Sunday, November 20, 2011

Quotes

I am a new subscriber to Lynda.com
This is a terrific site that is all about software training. I purchased Adobe Illustrator and the training at Lynda.com has been invaluable.
There are also documentaries. The last I have watched is on logotype designer Doyald Young --
"I have always liked helping people learn to draw. It is better to give than to receive. I think that teaching is rewarding. It (teaching) helps you decide what you believe in and what the real principles are that satisfy your aesthetic."

"I'm still learning how to draw. There are no secrets to what I do. All that I do is hard work and observation. Really! and doing things over and over until you're satisfied with them and think they're right." This says the eighty year old of the craft he has practiced since youth.

Thanks Doyald and thanks Lynda.com

Tuesday, September 13, 2011

Connect the Dot Design

UnCommon Threads Quilt Guild Retreat is coming up in November. My class, Connect the Dot Design is filling up fast! This is a little information about the supplies... plus a visual aid (love them!).


Connect the Dot Design


Supply List


Fine Tip Sharpie

Ultra Fine Tip Sharpie

Pencil (mechanical pencil is preferred*)

Pencil sharpener (for 2 mm mechanical or wooden**)

Straight Edge or Drafting Ruler

Eraser (pink rectangular with angled edge)


Notes on Supplies --

*I prefer a 2 mm Mechanical pencil (often labeled Drafting Pencil) as it is a little thicker than the 5 mm or 9 mm pencils. This preference id due to drawing with them and having a heavy hand that breaks finer leads. Use what you have, or is most available/cheap!

**When you choose a finer/thinner lead there is no need for a sharpener. With a 2 mm or a wooden pencil there is. These two require different sharpeners. No matter which you choose if it does not have a built in container to capture the shavings please bring a small container for that purpose!


ALSO - a drafting ruler or straight edge (Some times labeled a Grid Ruler) is a good tool to have. Rotary cutting rulers work, but the thickness of them is cumbersome. Using other items, like the edge of a pad or book also works -- seeing through the straight edge is invaluable!


***Don’t let anything get in your way! A pencil with an eraser will suffice. The other supplies just make it simpler and more accurate.

Kit Contains

Copy Paper

Card Stock

Tracing Paper

Layout Grids and Graph Paper


Things you will need to do more at home

*Exacto knife (with new blade or extra blades) or Box Cutter

Small cutting mat (12 x 12 or similar)

Square Rotary Cutting Ruler (9.5 x 9.5)

Screw Punch or Hole Punch and Hammer

I will have Punches in class for use and sharing - if you have one bring it.

Wednesday, September 7, 2011

Layers

Going to a class with Carol Soderlund at the Crow Timber Frame Barn in a couple of weeks. The class is "Layer upon Layer" ad we have been asked to find images that we are inspired by of layer. Here are some of mine....

Click to play this Smilebox slideshow
Create your own slideshow - Powered by Smilebox
Free picture slideshow personalized with Smilebox

Wednesday, August 31, 2011

Connect the Dot Design

Connect The Dot Design

Remember as a child doing connect the dots and pictures would appear. This is that simple.
From a couple of simple dots will come lines and from repeated lines will build blocks

Blocks that can be just a block, can be used in multiple to create layouts for a whole quilt.

Or perhaps they will be the inspiration for a whole cloth quilting design...

This is a simple workshop that will take you though the basics of designing; a block a layout for blocks or quilting. You choose!
All this with no math!

Friday, August 19, 2011

Tripping Fest Begins


I just got a new iPad.
I like it.
THEN I was asked what apps I liked.
My reply was that I was not really into apps.
But I did NEED a drawing app -- so I went looking.
And found TRIPPING FEST!
What a great thing!
I lost yesterday.
But here was what I found.
Some I created on my own, but most were collaborations. First with Christopher then Lydia (she is three and awesome!) and then Tripping Fest the Game was born and Christopher, Dana and I all played. FUN!
Let me know what you think.

Click to play this Smilebox slideshow
Create your own slideshow - Powered by Smilebox
Picture slideshow created with Smilebox

Saturday, July 9, 2011

Derailed


I love hand dyed fabrics.*
Like most quilters I love them and buy or make them and then don't know what to do with them.
THEN I watched an episode of Design Matters TV with Laura Kemshall
http://www.lindakemshall.com/DesignMattersTV.html
She took a piece if hand dyed fabric and made a rail fence block and then quilt. Interesting, imaginative and simple! Not to mention that it makes perfect use of those multi coloured hand dyed fabrics that you don't know what to do with.
This is the fabric before cutting it up.
After cutting it into 4.5 inch strips the width of the fabric then 1.5 inch strips it was sorted into groups by colour. A lengthy process that really is a great exercise on colour and decision making! Then four strips were sewn into a block and blocks arranged -- another lengthy process requiring making up my mind. Easier said than done!
This is the resulting layout all sewn together
I love the way the mottling of the fabric when cut makes the colours sparkle. The mixed vertical and horizontal nature of a rial fence lay out adds another layer of texture to the surface.
Now on to quilting it. More decisions!
Make sure to check out Design Matters TV!

*Love them enough to take Carol Soderlund's class on dying. Two classes coming up this fall at the Crow Timber Frame Barn; True Colors and Layers upon Layers. I am looking forward to them!
http://carolsoderlund.com/

http://www.nancycrow.com/HTML/barnworkshops2011fall.html

Thursday, July 7, 2011

Quilting the quilt

I have been working on a huge service quilt. Huge for two reasons (a) I have been told my lap quilts are too small and (b) last fall after renovation I moved things around and now have a larger design wall. Larger space = larger work. Or so it would seem!
I though I would share some of what I have been doing in the quilting arena.
I created a stencil with my domestic machine.
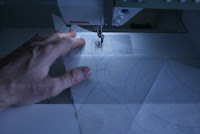
There is no thread in the machine and an old needle is being used to perforate a piece of tracing paper. The paper has been cut the size of an area that I want to repeat the same quilting in several areas. Just a simple design that outlines some areas for circles and another for cross hatching.
Tracing paper is good if you want to see what is under the stencil. Newsprint also works - cheap, but no seeing through it.
This is after laying the paper down and using a pounce pad to mark. The chalk goes through the holes in the paper leaving a line of dots to follow.
The finished area.
Here is another area. It was my intention to do less quilting on this project. I didn't like the results so I did more.
Better!

If you would like to take a class from a great quilter I have news for you! My friend Sanrda Ciolino, who is an awesome quilter is teaching a class at the barn. If you are not familiar with The Crow Barn it is a beautiful facility to take a class at. Relaxing and invigorating! Sandra's quilting designs are simple and effective and her calm manner makes her a great teacher. (I know as she has explained several things to me in classes we have taken together when I was a little slow on the uptake...) Best it is a three day class so there is plenty of time to understand the ideas and try them out! Also this is contemporary quilting design. Check it out!

Happy quilting!