Friday, December 17, 2010

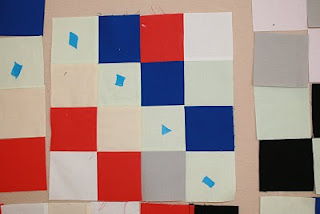
The piecing is finished on the new Irish Chain. Can you see how the lines run throughout? And see the idea of relationships intersecting?
It was an interesting construction process because I was trying to work ahead of myself. So I would not have as many bumps along the way -- made me realize why so many quilters like a pattern. DIRECTIONS!
I did try some new things with pressing that I hope will make quilting it easier. I pressed all the seams of the light pairs open which I hope the hopping foot will glide over and the rest to the darks. I plan to stitch in the ditch around the darks and not quilt inside them and hopefully the pressing will allow that to proceed smoothly.
Now I am thinking about the quilting. I want to quilt each colour with a repeating motif, but some areas I want to treat as one large area, those where several lights squares are adjacent. That would be in order to show off quilting. Is that the point though?
We shall see... I may put something else on the frame and let this marinate for a while.
Then again...
Oh -- if it looks like the exterior row of blocks is larger they are. I find the edges of the quilt, on the frame, to be insufficient. This is the first time I have built in extra room to make getting the top on the frame simpler. Another idea yet to prove itself worth while!

If you are interested in more information about the history of the traditional Irish Chain
http://www.womenfolk.com/quilt_pattern_history/irishchain.htm

Sunday, December 12, 2010

There has been progress, though yesterday I could not tell. See all the bits on the left -- that is all the stuff I sewed that I can not use. Wrong colour, wrong lay out...
The center started out simple. Everything to a certain point is symmetrical. Then it is not. I continued to construct as if it were still symmetrical. I needed mirror images and redid things to create that. That seemed like all I did yesterday.
REDO!
Today has seen progress. I have only the parts on the top and bottom to put together and then rows can be assembled.


One thing new with this project are the start and stops... I used to use a scrap of fabric folded in half to sew over and the end and beginning of each seam. This is common in chain piecing and keeps everything tidy.
I recently started using small squares, placed together at the beginnings and ends. So far in the process of piecing this top I have pieced this pile! A good start to another project and with little effort!


Tuesday, December 7, 2010

Portions of the Irish chain are complete.

The construction seems slow.
In the past I just plowed ahead sewing two squares together then pairing those and so on. The result was seams that did not fit together -- a mess!
So this time I have attempted to be more methodical. I create one quarter, pressed in to make sense, repeat that for each quadrant, then place it on the design wall seams on top. This way I can see them for pressing the adjacent blocks.
This was all fine until last night I realized I had sewn a 12 patch backwards. The whole thing, every seam on the wrong side.
All complete and corrected. Lets try and NOT have that happen again!


Here is a backwards block and the right way up block. Love doing things over!


One thing I though was smart. The little pieces of blue painters tape are to let me easily see the yellowish green squares distinct from the green squares. They are very close in colour, intentionally. And I really want to keep each in it's own place. This was my simple solution to manage the colours at a glance.


You can see here the green square to the right of the diagonal row. Looks the same in the photo -- looks similar in person!

Sunday, December 5, 2010

Click to play this Smilebox slideshow
Create your own slideshow - Powered by Smilebox
Free slideshow created with Smilebox


Had some bad news today -- a friends son passed away. I was thinking about the tragedy of a mother loosing her son and all the relationships in ones life that are effected. All of the sudden I saw new Irish Chain.
I stared with four colours. The cross through the middle is black. This represents the son.
Next is a red square that morphs with extensions. This is the son's wife, red for the passion of that relationship.
Then comes the blue, representing the father, and the intellectual connection I witnessed between the two. It begins as a square coming in from the edges, then I move it to surround the red and again extending to the edges.
Finally there is a dark green, a nurturing colour representing the mother. This row we only can see connecting at the bottom -- most of it is out of the picture plane where it remains unseen, because that is what Mom's do, they bear a lot where no one can see.
I am not sure how to support my friend, but I hope that spending time thinking of her in her time of grief somehow sends comforting energy her way.

Saturday, September 25, 2010

Praise for Carol


Last week I returned home from Whidbey Island, Washington, a short fairy ride from Seattle. It is a charming little coastal area in al the ways one would expect.
I was there to take a class from Carol Soderlund http://www.carolsoderlund.com/
She is a genius who teaches about colour. I took 'Color Mixing For Dyers'. A terrific introduction to color, dying and how to get predictable and repeatable results.
I say she is a genius because, well it's true. The reason is her mind. She not only has a colour theory that opened my eyes to colour in a new way and answered many questions I had, but her method of problem solving is phenomenal. Talk about a beautiful mind!

The other terrific outcome from the class was a swatch book. Swatches we dyed in class for over a thousand colours. A beautiful thing. Now the only thing that remains is to dye some fabric!

Tuesday, May 4, 2010

I have been working for a while on motifs for Nancy Crow's "Sets and Variables" class beginning next Sunday. After piecing a few different blocks or motifs yesterday I decided to take a simpler approach... ink on paper. I created 5 motifs on 2 inch squares of paper and then moved them around and photographed the results. Here they are for you to see.

Click to play this Smilebox slideshow: Sets adn Varables III
Create your own slideshow - Powered by Smilebox
Personalize your own free slideshow design

Monday, April 19, 2010

I posted these Contour Drawings earlier, but have had several questions so I thought I would write about them more; what the process is, what the objective is..


Contour drawings are all about learning to see - observation!

Begin by choosing an object. It might be a simple object like a doll (my first image) or a photo (the second image) or another drawing (third). Choosing a simple object to start is best, clean lines,minimal detail.

Place this object in direct view, but away from your drawing surface. If you are quilting then the machine is in front of you and the object should be to your right or left or perhaps above you (the doll and photo were about 18 inches in front of me and just slightly higher than eye level). They should be in a place where looking is easy not strained.

You are going to move your eye slowly along the edge of the object. Meanwhile you are moving your hand at the same rate you are moving your eye (thus the slow motion of eye!). Keep moving your eyes and following with your hands -- not looking at your hand/drawing. One discipline is not looking.

A contour drawing should be done for one to five minutes. All that time you are focusing on the object and NOT looking at the drawing.


The drawing will not look like the object. People who are deft at this and practice a lot still have drawings that look amateur. The resulting drawing is NOT the point. The act of looking IS!
When I did the first drawing I used all white thread on a black ground. The second and third I began with a thread that blended more with the fabric. Did a second drawing atop the first in a slightly more prominent thread and then did a sighted drawing (looking at object and drawing) with a contrasting thread. This way I was using one quilt sandwich and getting several contours out of it! You can do the same thing with drawing - I have used coloured pencil on paper and used a pale colour, then darker then darkest. Then I can differentiate the first attempt from second and so on.


Give it a try.
Remember the objective is LOOKING!
Your drawing might not look like the object! And that is fine!

Sunday, April 18, 2010


I could not believe it until I saw it with my own eyes! Yesterday my neighbor called to say she had seen a peacock in her yard. This may not strike you as odd if you know we live in the country. To me it was a shock. I had no idea that peacocks would live around here... In Tennessee?!
Today she called again, "He is headed down the hill to your place."
Out the door I flew with my new "Flip Mino" and shot this video.
The video is five minutes long. About two and a half minutes in the peacock moves and he strolls across the screen
I still can not believe that I saw a peacock in my woods!

Monday, April 5, 2010

I have spent this afternoon playing with Lino Printing.
I got some "Speed Ball" blanks, a carving kit and created a group of blocks. I used the printing as part of the pre-class exercises for the upcoming 'Sets and Variables' class I am taking with Nancy Crow. We are supposed to play with a motif. I am playing and having too much fun!
Here are shots of my sketch book with my motifs.

Click to play this Smilebox slideshow: Pre- Sets & Variables 2
Create your own slideshow - Powered by Smilebox
Slideshow design created with Smilebox

Saturday, April 3, 2010

Click to play this Smilebox slideshow: Spring at Proximity
Create your own slideshow - Powered by Smilebox
A free photo slideshow by Smilebox


Spring is really here. The cold weather has subsided and the trees and plants are budding... we have new tulips, muscari and daffodils coming up (Thanks Chris, Brenda, Zachary and Rebecca for the great Christmas gift!). As well the Cherries we planted a few years ago are blooming beautifully for the first time since planting. New crab apples and red buds are displaying great color as are the forsythia -- love that yellow!
Now for the pollen sensitive allergies to subside...

Wednesday, February 10, 2010

Click to play this Smilebox slideshow: New Orleans
Create your own slideshow - Powered by Smilebox
Make a Smilebox slideshow


We had a great trip to New Orleans recently. Enjoyed great visual feasts and awesome culinary ones as well as finding great people with terrific spirits and the stories that come with them...

In the culinary world we went to Muriel's, Stanley, Stella and Irene's. Interesting that they are all people names. The food was at least good and at best mind blowing. Stanley has THE Gumbo of Life! It is the flavor you are looking for in the world of gumbos. I then had a version of 'eggs benedict' with soft shell crab that was so yummy. Our waiter at Stanley was Nate. Nate is a great waiter. The kind of waiter who spoils you for any other. Knowledgeable about the menu and passionate about food and the whole of New Orleans. That night for dinner he waited on us at Stella (Stanley's big sister). At Stella we had a culinary experience that included tasting things I THOUGHT I had had previously, but their preparation made me question that -- Foie Gras and Marshmallows (not together). The former had a completely different texture and taste than I had had before, the latter literally melted in my mouth. The entire meal was a culinary orgy of delight and new flavor couplings. The staff was friendly, courteous and beyond efficient.

Our last night was the trip to Irene's, a little Italian place which fulfills every picture you have of that "little Italian place." Great Crab au gratin, a caesar that was what cesars are meant to be, and osso bucco. Need I say more?

We meet great people like the woman at 'The Idea Factory' (http://www.ideafactoryneworleans.com/) or the proprietress of The Magic Box (http://www.magicboxneworleans.com/) or the weaver at Louisiana Loomworks (http://customragrugs.com/). Great people and terrific merchandise.

Hope you enjoy the images from the trip and visit some of these places on your trip to the French Quarter.

Tuesday, January 19, 2010

I though I would share some of the work I have created over the past several years. From portraiture to abstract, from artsy to traditional there is a thread woven through it all!


Click to play this Smilebox slideshow: Work to 1-10
Create your own slideshow - Powered by Smilebox
Make a Smilebox slideshow


Isn't SmileBox great!

Saturday, January 9, 2010

Contours


In an effort to increase my aptitude in drawing I thought I would turn to a standby, Contour Drawing.
For those of you who have forgotten or blocked it out of your memory - in elementary school we drew our hands without looking at them. That was called a blind contour drawing. It produces weird drawings that rarely look like the object that was drawn. The idea is not recreating the object but rather to study and look at it, especially the edges. For me trying to move my eye and my hand at the same rate is the challenge. And on a domestic sewing machine so I am in effect moving my paper...
If you are thinking that it looks good that is because after doing three blind contours I did a contour drawing looking at the object. Here are the first three. (above is three blind contours and a drawing)

From an etching book. Three blind contours and then coloured pencil


A tulip from a magazine ad. Three blind contours, a drawing and then fabric paint. Seed stitching fills the background.